Backup Website Files from Old Hosting
- Log in to your old hosting cPanel/File Manager or connect via FTP (FileZilla).
- Go to the folder where WordPress is installed (public_html or a subfolder).
- Select all files and compress them into a ZIP file.
- Download the ZIP file to your local system.
Export the WordPress Database
- Go to phpMyAdmin in your old hosting panel.
- Select the WordPress database from the left sidebar.
- Click on the Export tab.
- Choose Quick and format as SQL.
- Click Go to download the .sql file.
Upload Files to New Hosting
- Log in to the new hosting panel (cPanel/File Manager or FTP).
- Navigate to the public_html or desired directory.
- Upload the ZIP file you downloaded earlier.
- Extract the ZIP to get all the files.
Create a New Database in New Hosting
- Go to MySQL Databases in cPanel.
- Create a new database and a new database user.
- Add the user to the database and grant All Privileges.
- Note down:
- Database Name
- Database User
- Password
Import the Database
- Open phpMyAdmin in the new hosting.
- Select the new database.
- Go to the Import tab.
- Upload the .sql file exported from the old hosting
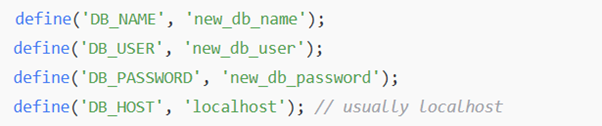
Update wp-config.php
- Open the wp-config.php file in your new server’s file manager.
- Update the following lines with the new database details:
Update Site URL (if domain is changed)
If you’re moving to a new domain, update the site URLs:
- Open phpMyAdmin → your database → wp_options table.
- Change the values of:
- siteurl
- home
- Update them with your new domain (e.g., https://newdomain.com).
Clean Up & Test
- Clear your browser cache or use incognito mode.
- Visit the new website URL.
- Check:
- Pages & posts
- Images
- Links
- Contact forms, etc.